How to Draw a Dynamic Cartoon Gazelle in 6 Simple Steps
Gazelles are renowned across the savannah for their effortless grace, slender legs, and springy leaps. When translating an agile creature like a gazelle into a playful cartoon character, the goal isn’t strict anatomical photorealism. Instead, it’s all about capturing gesture, rhythm, and distinct personality while keeping the underlying 3D forms readable and appealing.
🎨 Masterclass Series: Cartoon Animal Character Design
⏱️ Time Needed: 25–35 minutes
📐 Difficulty: Beginner to Intermediate
✏️ Recommended Tools: HB/2B Graphite Pencil, Kneaded Eraser, 0.3mm/0.5mm Fineliners, or Digital Tablet (Procreate / Clip Studio Paint)
🎨 Interactive Draw-Along Studio: Cartoon Gazelle
Prefer practicing directly on your tablet, iPad, or computer screen? Draw along using our in-browser Interactive Draw-Along Studio! Toggle traceable reference lines, select curated color swatches, and download your finished artwork:
 Step Guide 🔍
Loading Step...
Loading instructions...


Switch to Another Animal
Pick any animal below to start a new step-by-step draw-along!
Step Guide

🎉 High Five, Artist!
Your custom animal illustration is ready to download and share!

Complete Masterclass Overview
Here is your full visual reference showing how our cartoon gazelle develops from rough wireframe volumes all the way to final inked contours and two-tone shading:
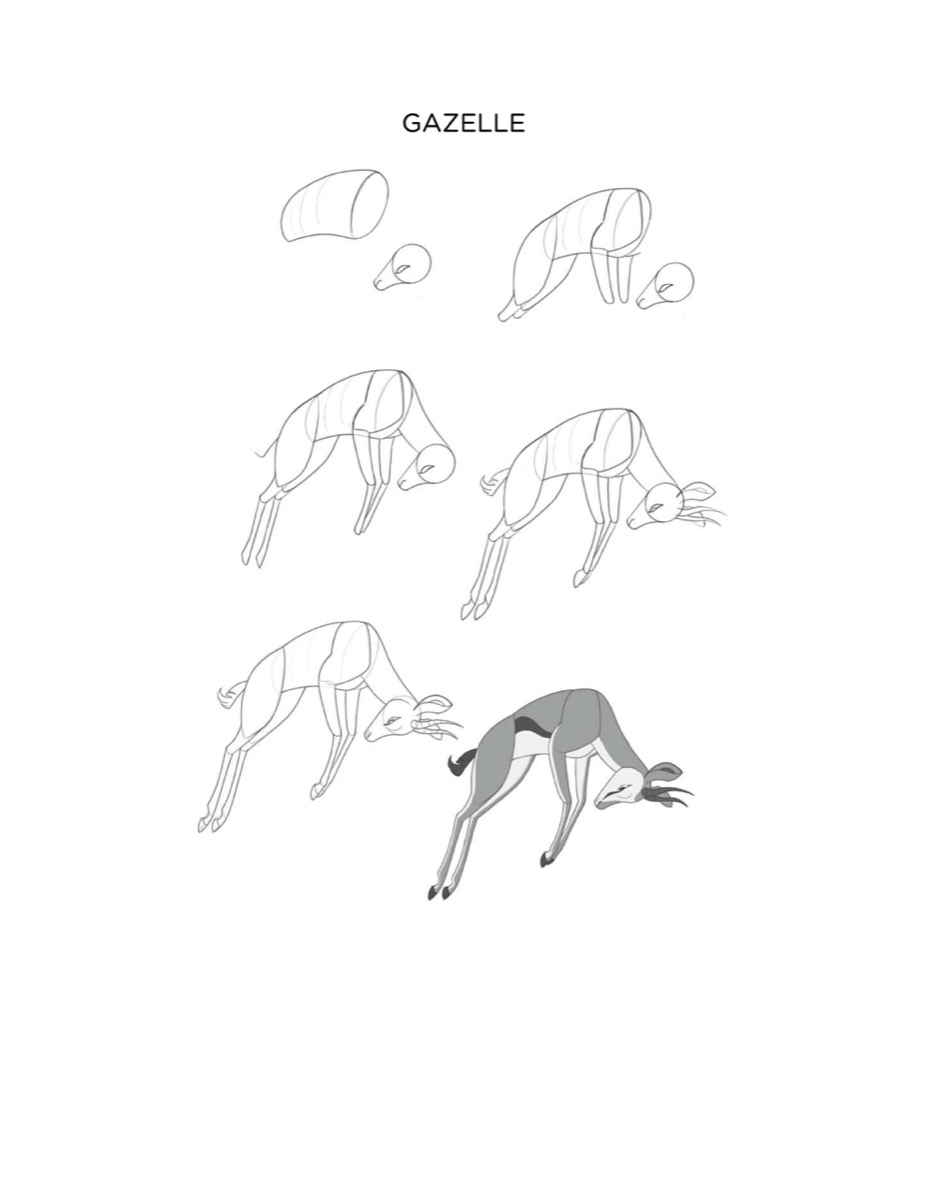
Step 1: The Core Volumes & Line of Action
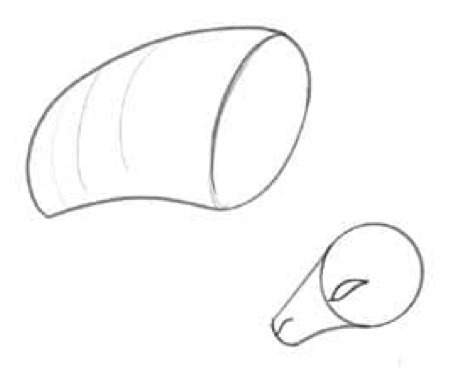
Every successful animal illustration starts with solid 3D volumes rather than flat silhouette tracing. When you think in geometric building blocks, your drawing instantly gains depth and presence:
- Establish the Torso (The Truncated Cylinder): Sketch an arching cylinder that tapers slightly toward the front chest. Keep the spine curve sweeping gently downward while the belly curves upward. Add an elliptical cross-section at the front shoulder to lock in the 3/4 viewing perspective.
- Place the Head Wedge: Position a compact conical wedge angled downward and forward. Cap the back of the head with an elliptical cross-section to mark the neck joint.
💡 Pro Artist Tip (Line of Action): Contrast the downward tilt of the head against the energetic arch of the back. This counter-curve instantly gives your cartoon gazelle its signature springy tension!
Step 2: Neck Connection & Upper Leg Blocks
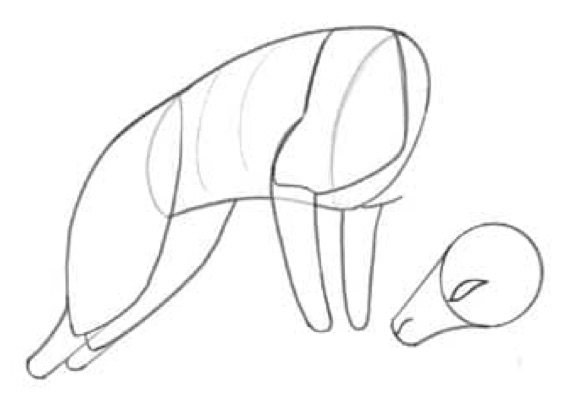
Now that the head and body anchor points are fixed in space, bridge them together seamlessly:
- Connect the Graceful Neck: Draw two sweeping parallel lines bridging the base of the skull into the chest shoulder ellipse. Keep the throat line clean and taut.
- Block in the Front Shoulder & Chest: Drop the muscular front chest downward and sketch the upper segment of the front forelegs.
- Anchor the Hind Haunches: Draw the curve of the back hip. Gazelles rely on massive hind muscle power for their legendary leaps, so keep the upper thigh sturdy before tapering.
Step 3: Leg Extension & Joint Mechanics
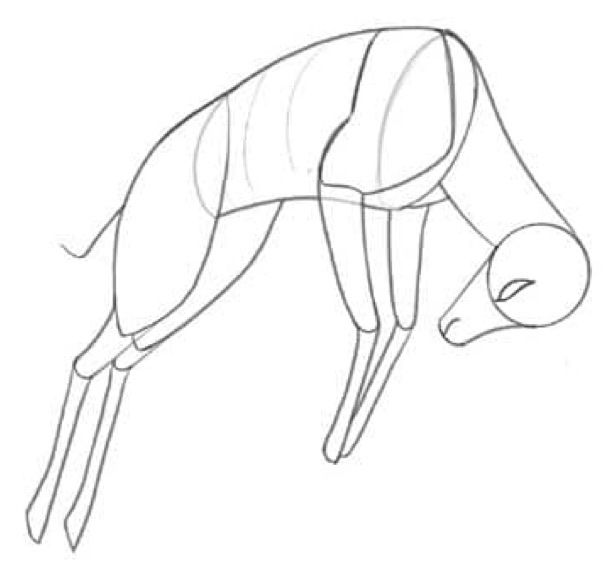
Slender legs are the hallmark of gazelle silhouette readability. Pay close attention to how quadruped joints articulate:
- Forelegs: Extend the slender lower forelegs downward, noting the slight backward bend at the “knee” (carpus) joint before descending toward the delicate hoof.
- Hindlegs (The Z-Angle): Quadruped hind legs form an elongated “Z” geometry. From hip to hock joint angles backward; from hock to ankle angles forward.
- Silhouette Clarity: Ensure the left and right legs do not merge into overlapping tangent blobs. Stagger them so each leg reads cleanly against the negative space.
Step 4: Horns, Ears, and Facial Anatomy
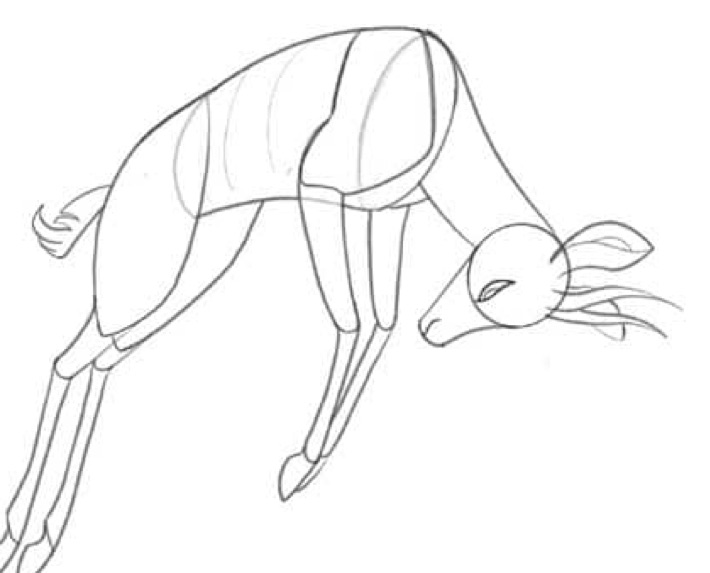
In this step, we add the charming features that make our character unmistakably a gazelle:
- The S-Curved Ribbed Horns: Sprout two sweeping horns from the forehead. Notice the gentle S-curve—backward, upward, then hooking slightly at the pointed tips. Add subtle cross-rib ridges along the horn stems.
- Leaf-Shaped Ears: Draw long, pointed ears angled backward and flared slightly outward, echoing the dynamic momentum of the horns.
- Facial Features & Tail Tuft: Refine the sleek bridge of the snout, mark the small nostril dip, and place an alert almond eye midway along the face plane. Finish by adding a cute flicked tail tuft at the rump.
Step 5: Clean Contour & Line Art Polish
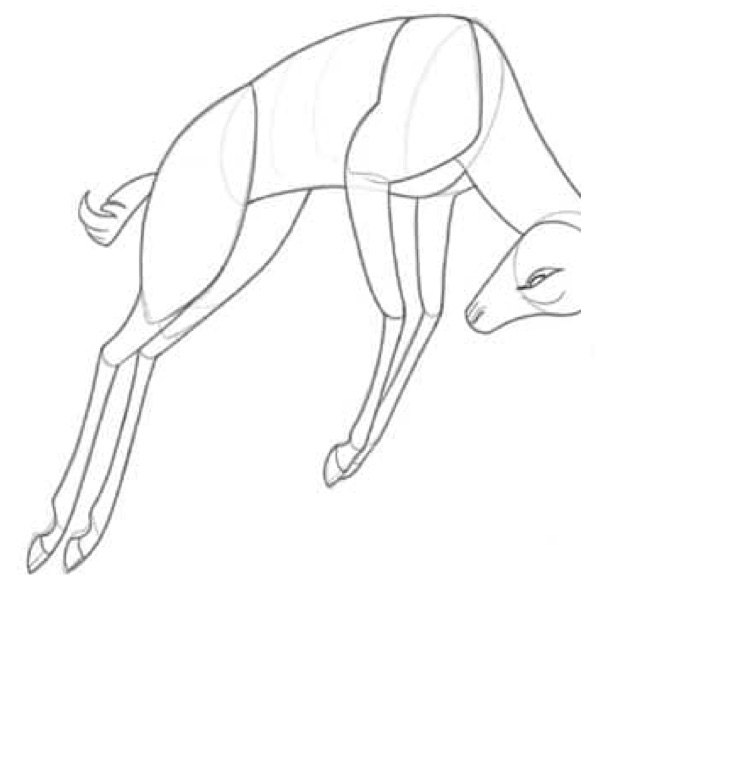
Now that your geometric blueprint is complete, it’s time to ink your definitive contour lines:
- Line Weight Hierarchy: Use bolder, confident strokes (0.5mm pen or 5–6px digital brush) along outer silhouette edges and underside cast shadows (jawline, belly, inner thighs).
- Internal Texture Lines: Use fine, delicate strokes (0.2mm pen or 2–3px digital brush) for interior anatomy lines, ear folds, and horn grooves.
- Erase Construction Guides: Cleanly remove initial wireframe spheres, cylinders, and joint guides so only the crisp character remains.
Step 6: Final Shading, Two-Tone Value & Character Finish
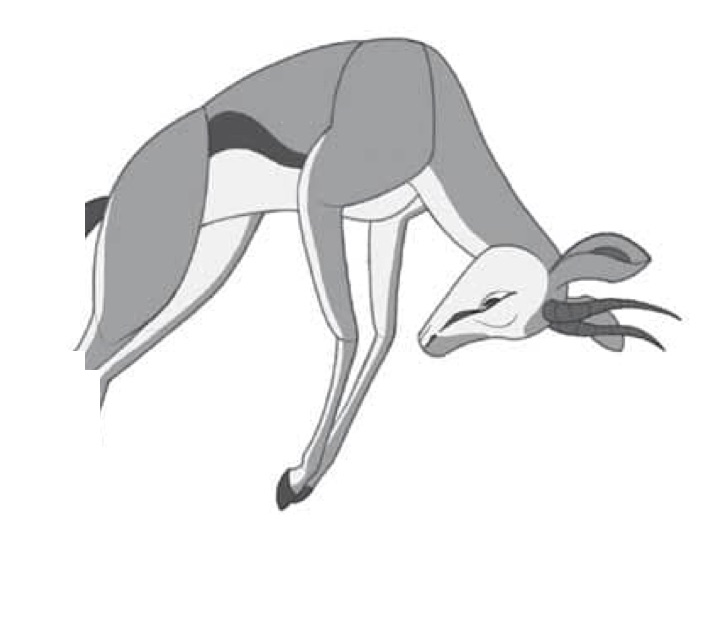
A smart two-tone value scheme gives your cartoon character instant depth without requiring hours of complex blending:
- Map the Value Boundary: Gazelles feature a distinct warm mantle separated from a pale belly. Draw a rhythmic parting line along the lower flank separating the upper coat from the white underbelly.
- Apply Solid Tonal Fills: Fill the mantle, back of neck, and upper limbs with a soft midtone shade. Leave the snout, inner ear, and underbelly bright white.
- High-Contrast Accents: Darken the tip of the hooves, the tail brush, horn ribs, and the alert eye pupil to make the design pop off the page.
Quick Design Principles Summary
| Element | Core Technique | Cartoon Exaggeration Rule |
|---|---|---|
| Line of Action | Arching S-curve from horns to tail | Emphasize speed and springiness by curving the spine |
| Legs & Hooves | Z-angle joint articulation | Taper lower ankles into slender lines for agility |
| Horns & Ears | Parallel S-curve + swept ears | Scale horns up slightly for memorable character silhouette |
| Value Scheme | High-contrast 2-tone split | Keep underbelly pure white against midtone mantle |
🎉 Ready for Your Next Drawing?
Explore more beginner-friendly wildlife guides, cute kawaii doodles, and sketchbook techniques in our tutorial collection: