How to Draw a Cute Kiwifruit Doodle in 6 Easy Steps
Kiwifruits are fuzzy on the outside and wonderfully vibrant on the inside! In this quick 5-minute tutorial, you will draw a whole cute kiwifruit paired with a fresh slice showing its starburst center.
New Zealand 🇳🇿
⏱️ 5 Min
⭐ Easy
✏️ 6 Steps
Quick Supplies Checklist 🎨
- Drawing Paper: Plain sketchbook paper, dot grid bullet journal, or sticky note.
- Outlining Pen: A 0.3mm to 0.5mm black fineliner (Micron, Uni-ball, or gel pen).
- Coloring Tools: Pastel alcohol markers, colored pencils, or mildliners.
- White Gel Pen: For optional eye sparkle highlights!
Step-by-Step Visual Guide 📋
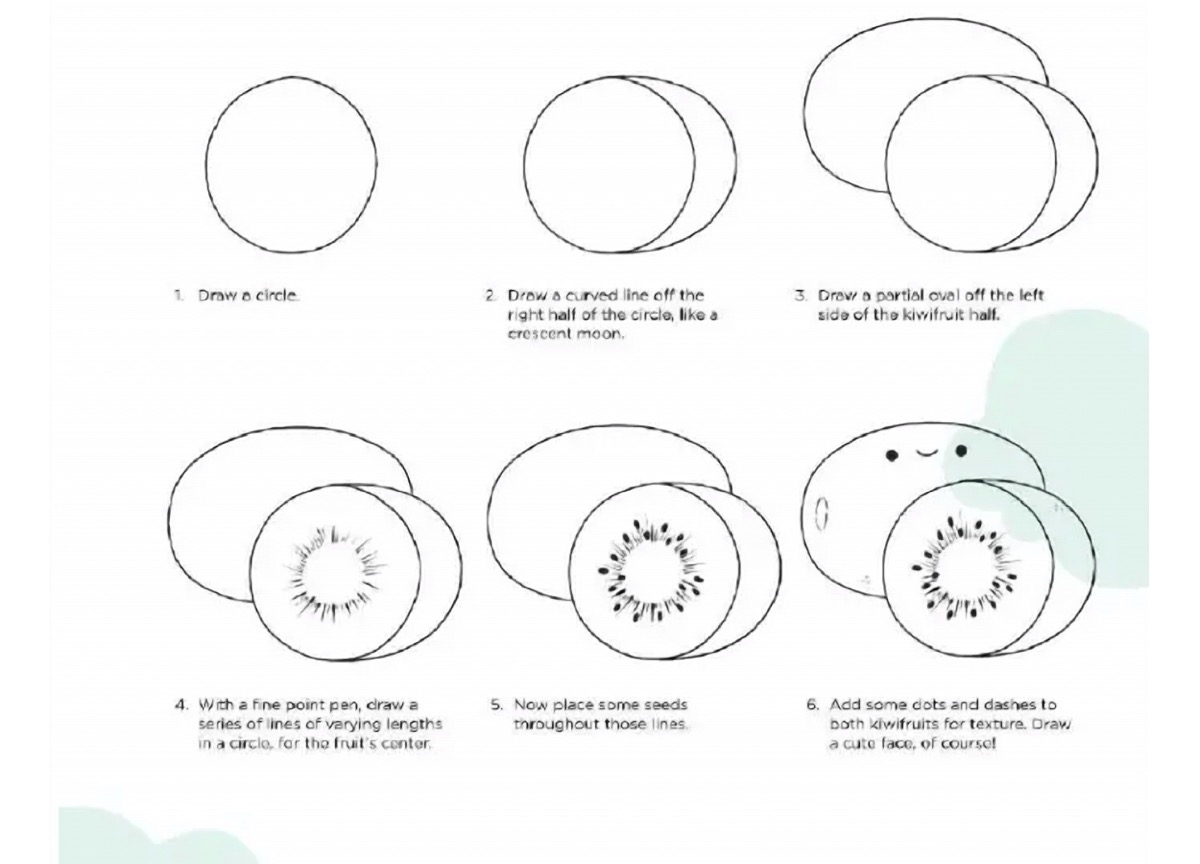
Draw the Slice Circle
Start by drawing a clean circle in the center of your page to represent the sliced kiwifruit face.
Add the Rind Crescent
Draw a curved line hugging the right outer edge of the circle like a slender crescent moon to create depth for the fruit rind.
Sketch the Whole Kiwi in the Back
Draw a smooth partial oval behind and to the left of your slice to form the whole fruit companion.
Draw the Starburst Core Rays
With a fine liner, sketch a circle of short radiating lines branching outward from the fruit center like rays of sunshine.
Add Kiwi Seeds
Dot tiny black teardrop-shaped seeds all around the tips of those radiating lines.
Add Texture & Cute Faces
Add light dash marks for fuzzy skin texture on the whole kiwi, then draw two wide eyes and a happy smile!
Artist Pro-Tip for Cute Results 💡
Color the whole kiwi in a warm kraft/light brown, and give the slice an electric lime green or pastel mint center with a creamy white core.
Explore More Cute Food Doodles!
This doodle is part of our comprehensive collection of aesthetic sketchbook prompts. Browse the complete library or check off daily challenges:
